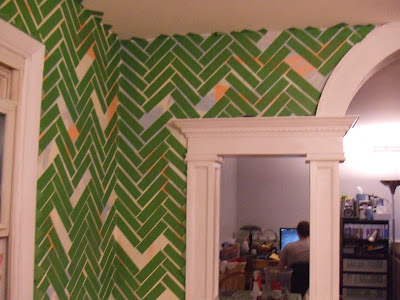
Before:
After:
Firstly, let's give credit where credit is due. I was inspired by this print by Nancy Ramirez. She's wonderful artist and surely hers is much better and classier than my pattern. She has a whole bunch of cool, colorful prints that you should check out!
Alright, down to the method. This is exceptionally time consuming and patience-wearing. I recommend you take a 10 day trip to Colorado in the middle to ease your nerves and recharge your motivation, as I did. *Aside: I actually wanted to finish this before I left, but Jeremy said that I couldn't because I'd get no sleep and drive myself crazy--true, but not what I wanted to hear*
First: Strip Your Ugly Wallpaper
Second: Prime
Third: Take all your leftfover paint and paint like crazy. This was a great money-saving technique. Jeremy and I had a hard time picking out the color for the dining room. It was all supposed to be one color, but we couldn't decide on anything. We don't realllllly want to reuse any colors in our house and Jeremy is morally opposed to white, cream, etc... I'm mostly okay with that, but I think that neutrals have their place too.
We were going to have some orange mixed to add to this room but at the last minute Jeremy found some "oops" sample sizes at Home Depot for 50 cents! We really only needed one (considering that we barely used any) but picked up three oranges close to each other for $1.50. This saved us $13 dollars on a quart of paint we didn't need. Well done Jeremy.
Fourth: Now the time consuming part. I had to cover the room in 2x8 strips of frogtape. I started by making an 8" template on a piece of plywood. EXCELLENT idea. So much better than measuring every piece.
Then I used a level and drew a straight line down the wall to use as a guide for the first row. I also employed a square to make sure the tape was making a right angle. This worked okay, but the pattern naturally seemed to skew itself. As I continued to work I could see that the lines were not straight. Even I as a tried to correct they would mess up the other part of the pattern. I had to settle for a slightly askew pattern, but you really can't tell in the finished product. If you look closely at the taped pictures you can see how there is a bit of a tilt. The white spaces, while artful, are completely necessary to keeping the pattern semi-straight.
Fifth: After about 16 hours of work, time for paint and peel. Ugh. This part made me grumpy. I tore through four pairs of latex gloves. I started by painting small section with Behr paint and primer in one. Usually I prime and paint separately, but I couldn't risk the colored pattern showing through. After coating a section with paint you pull off the strips on that part. As I learned after finishing a wall, it was better to let it get tacky for 10 minutes before pulling the tape off so that you'd have less smearing.
You can tell the tape is ready when it gets all crinkly, like this:
After two trashbags full of tape and some sad fingernails here's some shots of my dining room.
We will be replacing the chandelier to get something a little more appropriate for the style of our house. I am still deciding if I like the finished product. You should let me know if you like this--that will make me more confident about my decision *realization that this could be an awkward statement--what if NO ONE likes this? Then I will just have to be sad about a possibly ugly dining room.*


Laura, this is amazing! I am really impressed and can't wait to see it in person.
ReplyDeleteThis looks better as a room than a painting. And way better than wallpaper. Way to go Jeremy on the OOPS paint! But what color will the wainscot be???
ReplyDeleteAs much as I'd like a surprising wainscot color, it has to be white to match the living room because of the arch. Otherwise there'd be an awkward transition between the two rooms. We deliberately got the same white for the herringbone as we use for the trim, except in eggshell rather than high gloss to avoid clashing. :-)
ReplyDeleteWow, just wow! Time consuming sounds about right. This looks like it would take weeks. Very unique look, and very colorful and emotive. Kudos!
ReplyDelete